
Individual hose record
DS20131714 Hose Repair Specifications
Excavator · Doosan · DX160W-3 · Swing Motor
Finished length600 mm
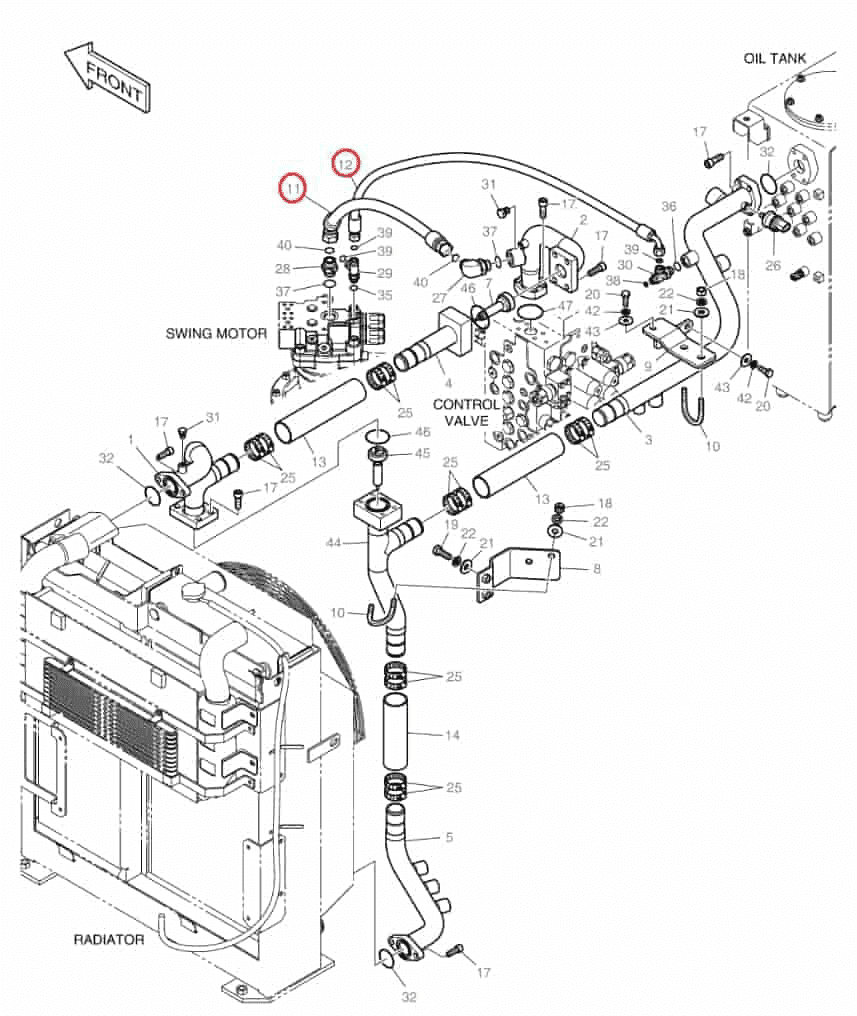
Locate this hose
Installation diagram — Pipe No. 12
Locate Pipe No. 12 in the diagram, then confirm part number DS20131714 before removing the hose.
Repair specifications
- Part number
- DS20131714
- Diagram pipe number
- 12
- Installation route
- Swing motor → return steel line (hydraulic tank)Original Chinese: 回转马达~回油铁管(液压油箱)
- Hose specification
- DN13;1SN-08;16MPa
- Finished length
- 600 mm
- Working pressure
- 16 MPa
- Left fitting
- American female thread, flat-face sealOriginal Chinese: 美制内螺纹平面密封
- Right fitting
- 90° elbow, American female thread, flat-face sealOriginal Chinese: 90°美制内螺纹平面密封
- Quantity
- 1
Optional cross-check
Ask an AI search tool to check this repair data
The question is already written for this machine or hose. Use a tool with web search enabled; treat its answer as a starting point and verify on the machine.
See the exact question being sent
I am checking hydraulic hose repair information for "DS20131714 Hose Repair Specifications". Use web search and cite a source for every factual point. Compare this HoseSeek page with manufacturer manuals and reliable parts documentation: https://www.hoseseek.com/hoses/hose_1c4ce16d4be78259ff4760ed/
HoseSeek currently shows: part number: DS20131714; diagram pipe number: 12; installation route: Swing motor → return steel line (hydraulic tank); hose specification: DN13;1SN-08;16MPa; finished length in millimetres: 600; left fitting: American female thread, flat-face seal; right fitting: 90° elbow, American female thread, flat-face seal.

Verify, where applicable:
1. Exact machine model and any serial-number range.
2. Hydraulic system and installation route.
3. Hose part number and diagram pipe number.
4. Finished length, hose specification, and pressure rating.
5. Both end fittings, including thread, sealing seat, size, and angle.
6. Installation-diagram position and routing.

State explicitly what you could not verify. Do not infer a missing dimension or fitting. End with a short on-machine checklist for a hose repair technician.
For reference only. Confirm the actual hose before fabrication.